Showing posts with label Vegetarian. Show all posts

Wednesday, February 29, 2012

Fruit and yogurt Sunday smoothie


It's been a long time! I know! But I'm fine, cooking as always and enjoying life. In fact, probably enjoying life too much, that's why there was no posting for such a long time!

I felt a bit guilty but since I am in a hurry I will post a very simple breakfast recipe that I made for my sister when she was visiting in January. I call it Sunday smoothie! You can go the easy way and mix all the ingredients in a blender or you can do it the pretty way, in colorful layers. There is not much of cooking to be honest, I know it is cheating but I just really like it!

INGREDIENTS:

(for 4 glasses)

2 cups plain yogurt
2 tbsp honey
2 large, ripe mangoes
1 cup red berries
2 ripe kiwis
extra berries for garnishing

1. Mix yogurt and honey in a bowl and divide the mix between 4 glasses.
2. Place the mangoes in a blender and process until smooth. Divide between the glasses.
3. Continues with the rest of the fruits, each one separately, making colorful layers, one on top of the other.
4. Garnish with extra honey and berries and serve. Mix well before drinking, otherwise you will end up with plain yogurt on the bottom of your glass! :P

Very simple, yet so beautiful and yummy! Other variations include bananas, pineapples, mellon, pears or any other soft fruit.

Sunday, November 13, 2011

Cheese and Mushrooms Pie


Lately my man has been really stressed with his research and I can't do much to cheer him up. Although there is a little trick that almost always works. New, delicious recipes on our table! So, since he really likes pies, last weekend I made a completely new pie, a mushroom pie!

First I was thinking to make it the easy way, using phyllo sheets. But then I thought I could be a bit more creative, so I decided to make it with curu dough, which is a very typical Greek kind of pastry, used in many pies. It is soft and slightly sandy and it literally melts in your mouth! Of course this meant that I would spend at least one extra hour in the kitchen, but since I enjoy it anyways I don't really care!

INGREDIENTS:

For the curu dough:
800gr white flour, sieved
1 cup olive oil
1 full cup thick, Greek yogurt (Straggisto)
2 eggs
1 tsp salt
1 tbsp dry yeast

For the stuffing:
500gr fresh mushrooms, chopped
3 onions, sliced
150 gr yellow cheese, grated (Gouda worked just fine for me)
150 gr Mozzarella, grated
300 gr Greek feta cheese, crashed
1/2 cup fresh parsley, chopped
4 eggs
1/2 cup thick Greek yogurt
1/4 cup olive oil
paprika and fresh ground black pepper to taste

1. First prepare the curu dough. In a large bowl place the oil, yogurt, eggs and yeast and beat with a mixer.
2. Keep beating and slowly start mixing in the flour. Once the mixture is too thick for the mixer, continue adding the flour and mixing with your hands. Place the dough on a table and work it with your hands for about 20 minutes. You will notice that as you work the dough will become more elastic. Shape it in a ball, place in a large bowl, cover with a kitchen towel and leave in a worm place to rest.
3. Prepare the stuffing. In a large pan heat the oil. Add the mushrooms and onions and saute until the vegetables are soft. Set aside.
4. In a separate bowl beat the eggs (reserve a couple of tablespoons to brush the pie), add the cheeses and the yogurt and season with pepper and paprika. Fold in the mushroom mix and the parsley and mix well.
5. Take the dough and divide it in 2 pieces, one slightly bigger than the other. Take the bigger one an place it on greased table. Use a roller to flatten the dough into 5mm thick sheet, big enough to cover a large backing tray and its walls. Fold the sheet twice, transfer on the backing tray and unfold so that it would cover the whole surface and the walls. Fold all the stuffing on top and even out with a spoon.
6. Take the remaining dough and again using a roller flatten the dough so that the sheet is big enough to cover the tray. Fold it, transfer on top of the stuffing and unfold. Using a fork or just your fingers seal the pie by sticking the bottom and the top sheets together.
7. Brush the pie with the beaten egg and back in the preheated oven at about 180°C for about half an our, until the pie is golden from outside. Serve either warm or cold, as a main course or just a starter. Ah, it's also great for a quick breakfast, given, of course that you have it prepared from the previous night :P

Wednesday, November 2, 2011

Cheese filled Tortilla toasts


In Greece we say: "A good day could be seen since morning". Well in my case it was the other way around. While I was biking to the train station in the morning, the chain fell off of my bike. I didn't want to become all messy while fixing it, so I dropped it there and walked. Of course I missed my train, the next one was cancelled (or at least I never saw it arriving) and the next one came with a delay of 10 minutes. So I came to the office about 45 later than I was planning. It would be great if the chain of bad luck would end there, but no! All kinds of issues during the day... Typical beginning of a month! The only good thing that happened was the lunch break at the new Surinamese place nearby. I think this place is totally gonna beat the Italian sandwich, the Turkish kebab and both of the Chinese restaurants that we usually go to!

Anyway, when I finally arrived home, well after 7pm I was totally wasted and super hungry. Of course there was no way I would cook anything too complicated. The most I would go for was a quick sandwich, after which I was planning to kick back with a book on the couch. Then I saw a half pack of tortillas and thought I could as well use them instead of bread. After a quick look at the fridge I came up with the following recipe. The result was crispy outside and with melted cheese inside! Definitely goes to my favorites! :)

INGREDIENTS:

2 corn tortillas
100gr Gruyere-type cheese, thinly sliced (I used Ladotyri, which is a hard-type of Greek cheese, traditionally produces on the island of Lesbos)
1/2 sweet red bell pepper, thinly sliced
1 handful fresh basil leaves
1 garlic clove, finely chopped
1 tbsp olive oil

1. Heat some olive oil in a non-stick pan.
2. Place one tortilla on a pan. Arrange the cheese slices, pepper stripes, basil leaves and garlic evenly on top of the tortilla.
3. Cover with the second tortilla and fry on medium heat for about 2-3 minutes or until the lower tortilla is golden brown. Flip and fry on the other side. Cut in 6 pieces and enjoy!

Thursday, October 27, 2011

Green salad with figs and walnuts


A bit more than a year ago my mom started working in another hospital, in Kastoria, about two and a half hours away from Thessaloniki. So now she spends about 4 days a week there and 3 days back home. At first I was a bit worried, you know, it's not easy to change your every day routine from one day to another and I guess age does not help much here. But after she settled down there I figured that she actually enjoys the lifestyle of a smaller city. Being there alone (my dad works in Thessaloniki, so he stayed there) she started new hobbies and sports. My dad generally is very conservative when it comes to food. So in the past, when cooking, my mom stayed within the limits of my dad's taste. And now she totally grabbed the chance and started experimenting with new ingredients and new combinations!

Last Christmas me, Stratis and my dad went to Kastoria. So my mom wanted to impress us with her new cooking discoveries. Among other things she made a really nice salad, which all of us liked a lot. Fresh lettuce blended with the sweetness of dried figs and a touch of balsamico was just wonderful and full of flavor, great during the winter, when the big, ripe tomatoes are impossible to find! There is no exact proportions of the ingredients, it really depends on your personal preferences. Here I post more or less the amounts that I used, but it's really a try and fail process! :)

INGREDIENTS:

5-7 large lettuce leaves, roughly chopped (enough to fill a large salad bowl)
2 handfuls fresh rucola leaves
3-4 dried figs, quartered
1 tbsp black raisins
1 small handful walnuts, chopped

For the dressing:
3 tbsp balsamico
1 1/2 tbsp liquid honey (I like thyme honey, but you could use any other)
freshly ground black pepper to taste

1. Mix all the ingredients for the dressing in a separate small bowl.
2. In a large salad bowl mix the lettuce, rucola, figs, raisins and walnuts. Pour over the dressing and add some extra black pepper if you like and it's ready! So simple!

Wednesday, September 21, 2011

Ladero - Greek oily green beans


Today I went through some of the old posts and I realized that at least every 4th post starts with the words "I haven't been blogging for some time now" or something similar. It becomes annoying!

Anyways, the recipe that I wanna post today is traditional Greek. "Ladero" could be literally translated as "something oily" and it is being cooked all over the country as a main dinner course. Nothing fancy, but very healthy! It contains a generous amount of oil, but it is ALWAYS extra virgin olive oil, which is good for your health when used in moderation, so don't be afraid :)

Even though it is so popular, my mom never cooked it (probably because she grew up in a different country, with different food culture). So, the first time I tried it was actually at the university restaurant back in Thessaloniki. It was a a fixed part of the Wednesday menu, followed by a chocolate mousse! I liked it a lot and after some point started cooking it myself :) Here is one of the multiple versions of this dish. Enjoy!

INGREDIENTS:

1kg green beans
2-3 carrots, sliced in circles
2 large onions, diced
3 large, ripe tomatoes, grated
1 large red bell pepper, diced
2-3 cloves garlic, finely chopped
2 tbsp tomato puree
2 cups water
1 cup extra virgin olive oil
2 cups fresh parsley, finely chopped
2-3 large bay leaves
1 tbsp dried oregano
1 tbsp sugar salt and black pepper to taste

1. First prepare the beans. Wash them well and cut off the tips in case they are hard. If the beans are too long cut them in pieces of 4-5cm long. This could the annoying, but this is the only step that requires time, the rest is just piece of cake!

2. In a large pot heat half of the oil. Add the onions and garlic and sauté on a medium heat until soft (not golden).

3. Add the beans, carrots, peppers and grated tomato, mix well and cook for few minutes, just until the beans turn bright green.

4. Add the tomato puree, water, half of the parsley, bay leaves, oregano and sugar, cover the pot and cook for about 30 minutes or until the vegetables are soft but still crunchy. If necessary add more water to the pot so that the sauce remains liquid.

5. Turn off the heat, add the rest of the parsley and oil, mix well, cover the pot and let it stay for about 15 minutes. Serve along with feta cheese (I prefer with grated Ksyromizithra) and thick slices of fresh bread to dip in the juices.

Monday, June 20, 2011

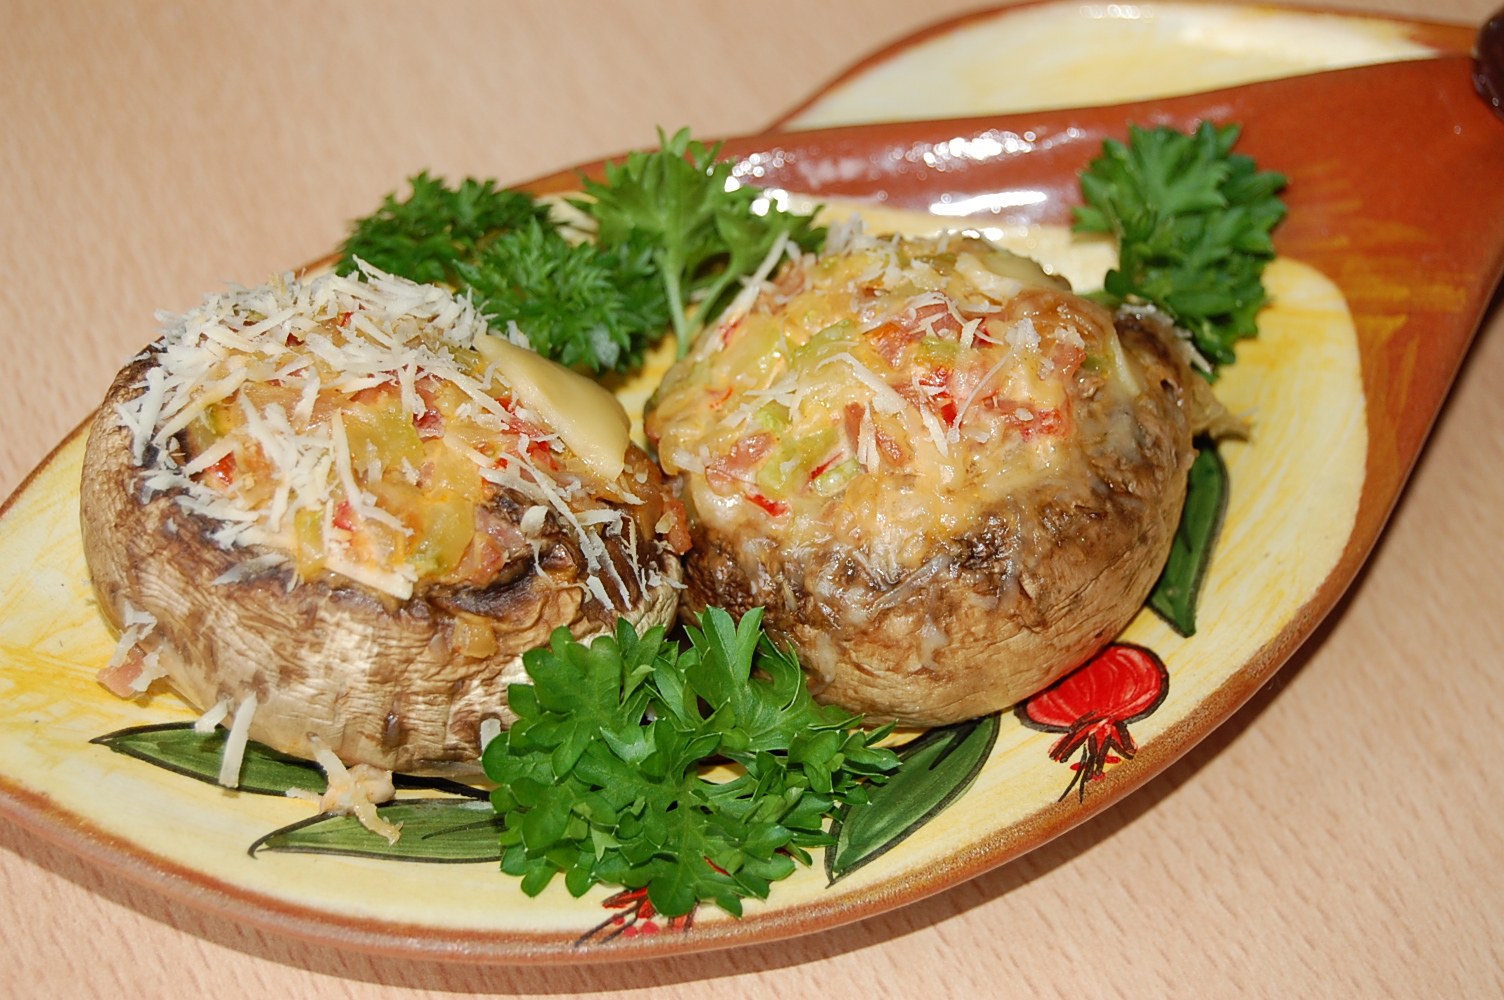
Stuffed mushrooms


With all the fuss about the e.coli and the uncertainty weather it comes from vegetables or not, I realized that I've been cooking too much meat lately. Therefore, the dinner this weekend was almost completely vegetarian. However, I cooked mushrooms which are said to be the "meat of the poor".

For one more time, I tried recreating my mom's recipe of stuffed mushrooms. I can not remember when particularly this recipe made it's debut on our dinner table, but it was reoccurring from time to time, each time with a little twist.

So, since the weekend was all about vegetarian food, I thought these mushrooms would be just a great idea. Unfortunately, I could not get mom on the phone since she had a long shift at the hospital. So, the only solution was to improvise. I think, I managed to remember most of the ingredients and the result resembled quit closely the original thing. I could not resist adding some bacon to the stuffing, but you could skip it for a vegetarian version.

INGREDIENTS:

15 large (about 4-5cm in diameter) champignon mushrooms, washed
2 tbsp olive oil
1 small zucchini, very finely chopped
1 small onion, finely chopped
1 red paprika, very finely chopped (optional)
5 slices bacon or smoked ham, finely chopped
3-4 tbsp creme fraiche or sour cream
1/2 cup grated Parmesan cheese
salt, ground black and red pepper to taste

1. Remove the stems from the mushrooms, set the caps aside and finely dice the stems.
2. In a heavy sauce pan heat the oil.
3. Add the onions and cook on average heat until soft.
4. Stir in the diced mushroom stems, zucchini, paprika and bacon or ham (if using) and cook for about 10 minutes until the vegetables are soft.
5. Add the creme fraiche, season with salt and pepper and set aside.
6. Using a spoon stuff the mushroom caps with the filling and place in an ovenproof deep caserole dish, stuffing facing up.
7. Sprinkle the grated cheese on top of the mushrooms and bake in the preheated oven for about 30 minutes. Serve either hot or chilled, as a starter or a part of a main course. Also very good for party food, a bit more complicated than pop corn and tortillas with salsa :P

Tuesday, June 7, 2011

Rice with grape leaves, sun dried tomatoes and raisins


It's amazing what you can find in the freezer when defrosting it. Tiny boxes with baby corn, diced onions and chopped parsley, leftover cookie dough and ... what's that? Grape leaves?! How long have they been in there?! Stratis found them at a Turkish store and thought it would be cool to make dolmadakia (little grape leaves rolls with rice stuffing). However, after the first, not very successful attempt there was more than half pack left, so it ended up lying pointless in the freezer, until I discovered it yesterday.

Luckily, a couple of days ago I was browsing through one of my most favorite cooking blogs dedicated to Greek food, owned by Peter Minakis. Few months ago he posted a recipe for a rice-based side dish which really intrigued me when I first read it. It was pretty much a fuss-free version of dolmadakia. The idea was to prepare the stuffing and then mix in the chopped grape leaves. Smaaaaart! You get all the flavor of dolmadakia without having to spend hours in the kitchen rolling them! Great!

I changed a bit the proportions of the ingredients, used slightly different herbs and added a sun dried tomato. I think it was one of those rare times when Stratis was not complaining about the plain rice for side dish :)

INGREDIENTS:

1 cup long grain rice, washed
3 tbsp extra virgin olive oil
1 large onion, diced
3 garlic cloves, finely chopped
1/2 cup parsley, finely chopped
2-3 tbsp chives, finely chopped
juice of 1 lemon
1/2 cup black raisins, washed and soaked in hot water
2 tbsp pine nuts
1/3 cup canned sun dried tomatoes, finely chopped
1 cup canned grape leaves, washed and chopped
2 cups hot chicken stock or water
salt and ground black pepper to taste

1. In a large pan heat the oil and saute the garlic and onions until soft.
2. Stir in the rice and cook together for a couple of minutes.
3. Add the parsley, chives, raisins, pine nuts, sun dried tomatoes, grape leaves, lemon juice and chicken stock, cover with a lid and cook on a medium heat for about 20 minutes or until the rice is soft. Add more water if the rice looks dry.
4. Season with salt, pepper and extra lemon juice and ready!

Wednesday, April 13, 2011

Spring Couscous


Since I started working I obviously have much less free time, which during the weeks means pretty much that I have to either cook on everyday basis something fast and easy or otherwise prepare something from the previous evening, preferably something that would last for a couple of days. Yesterday I made Stratis' favorite burgers with potato puree. Today we still had few burgers left but there was no side dish since we finished all the puree yesterday.

Generally, I really enjoy the idea of couscous as a really fast yet delicious side dish. You could flavor it with spices and herbs or by using chicken stock instead of water to soak it in. Mixing in chopped vegetables like tomatoes, onions, paprika, cucumber, broccoli, mushrooms etc is also great.

So on my way home I already knew what I would cook. A friend of mine cooked a similar recipe few years ago at our ethnic dinner party. I changed it a bit mainly by adding zucchini and olives and using less lemon juice but the main idea is same. It's a great side dish and if you increase the amounts of veg and use less couscous you could make a wonderful salad too!

INGREDIENTS:

3 cups couscous
3 large ripe tomatoes
1 zucchini, diced
1 tbsp olive oil
1 cup parsley, finely chopped
2-3 tbsp black olives, finely chopped (optional)
juice of 1/2 lemon
salt and ground black pepper to taste

1. Place the couscous in a large bowl, add lightly salted boiled water enough to cover, cover with a lid and let the couscous absorb the water.
2. Meanwhile in a non-stick pan heat the oil and stir-fry the zucchinis for 3-4 minutes, until they get a light golden color.
3. Dice the tomatoes trying to keep the juice and set aside,
4. Once the couscous is soft, mix it with a fork to make it fluffy.
5. Add the fried zucchinis, tomatoes, olives (if using) and the lemon juice and mi well. Season with salt and pepper and enjoy!

Thursday, February 24, 2011

Lobio - Georgian Bean and Walnut Soup


My mom is a wonderful cook. I think this happens also because of all the amazing recipes she knows from my grandma, who is the top cook in my opinion.

My mom loves special dishes, which blend the ingredients in not-so-obvious combinations. That is why one of her favorite cuisines is Georgian. Generally, Caucasian people have a very tasty food. Georgian cuisine is particularly popular, due to it's diverse character. It is famous for cheese, like suluguni, and cheese pies, khachapuri, various meat dishes, with the most famous - khinkali, a type of meat-filled dumpling and of course multiple appetizers. The flavors vary from very spicy to sweet and satisfy even the most demanding food-lovers.

One of my favorite soups (yes I know, I am supposed not to like soups, but this is changing the last years) is Lobio, a thick soup made with red beans and walnuts. This is exactly a not-so-obvious combination that I was talking about before. Few days ago I was planning to cook a bean soup, however I was a bit bored to cook a typical Greek Fasolada, so I decided to go for Lobio. It was the first time I cooked it for Stratis and, to be honest, I was not sure if he would like this mix. But, luckily, he loved it and I am not surprised. This is a really great example of traditional Georgian food.

INGREDIENTS:

500gr red kidney beans
1 cup walnuts, shelled
1 tsp mustard (optional, it eliminates the whatever effects of the beans on your intestines :P )
1 tbsp olive oil
2 onions, diced (I like it with a lot of onion, so I use 2 big ones, otherwise you could use 2 medium)
1 medium carrot, shredded
2 cloves garlic, minced
1/2 cup fresh coriander, finely chopped
2 tbsp fresh parsley, finely chopped
2 tbsp fresh dill, finely chopped
1/2 tsp coriander seeds
salt and ground black pepper to taste

1. Wash the beans very well and soak them overnight. Do not through the soaking water, as it contains a lot of vitamins.
2. In a large pot place the beans together with the soaking water, coriander seeds and mustard if using. Add about 4 more cups of water and bring to the boil. Reduce the heat and continue cooking until the beans are soft.
3. Meanwhile, in a heavy pan heat the oil and stir-fry the onions, carrot and garlic until the vegetables are soft and lightly golden.
4. Place the walnuts with some water in a blender and process until they form an almost uniform paste with only few pieces of walnuts. Set aside.
5. Place two cups of soft beans from the soup together with 1 cup of the liquid in a blender and process in a smooth paste. Return to the pot.
6. Add the walnut paste, the onion mixture salt and pepper to the pot, mix well and let cook for about 15 minutes. At this stage if your soup is too think add some more water until it reaches the desired consistency.
7. Add all the herbs, season with extra salt and pepper if necessary and cook for few more minutes. Garnish with some fresh coriander and serve immediately.

Friday, February 11, 2011

Cheese fondue


A couple of months ago we got a fondue set. An electric one. It's not so atmospheric as those with the little candle under the pot, but the good thing about it is that it is easy to regulate the temperature. This way whatever is melting in the pot is not burned.

Anyway, I was planning to use it once my sister would come to visit, but finally when she came we totally forgot about it. But today I took a big decision! It was very nice! So here comes the recipe:

INGREDIENTS:

300 gr, Emmental-type cheese, preferably not very salty, shredded

1 cup white wine

1/2 tsp sweet paprika

1 tbsp lemon juice

1/2 tsp dry mustard
some ground nutmeg

1. In the fondue pot mix the wine, paprika, lemon juice, mustard and nutmeg and bring to the boil.

2. Reduce the heat and start slowly stirring the cheese into the wine mixture.

3. With a wooden spatula constantly keep stirring the cheese until it melts.

4. Transfer the fondue pot to the base and set the heat on low. It should not be boiling, but rather stay liquid and creamy.


Serve it with various pieces of veg, ham, shrimp, crackers, bread etc. Have fun!

Thursday, February 3, 2011

Buckwheat kasha or porridge


Two days ago the weather was sunny again so it was a great opportunity to go out, ride a bike, take some beautiful pictures of the city and not to think at all of what I would cook later. Unfortunately, a hungry man, returning from the office probably would not share my joy. So when I realized that it was already 6pm so I had to go with something ultra quick. While I was switching between pasta and... well pasta... my eye stopped on a pack of buckwheat that I bought a couple of days ago.

A pack of what?! Buckwheat? What the hell is that? If you never lived in Russia or other countries of ex USSR, these are probably the questions going through your mind, as this "pseudograin" is not very common outside these areas. And I really don't know why this is the case, since it is really tasty and it reminds me a bit of my childhood. So I was really happy to discover it in the Turkish store (what would I really do without it!) in my neighborhood.

When you open the package you see brownish little grains, pyramid-shaped. You don't have to soak it overnight or do anything else. Just rinse it a bit with some water and it is ready to be cooked.

INGREDIENTS:

3 cups buckwheat

2 tbsp butter or in worse case margarine

water for cooking

salt and ground black pepper to taste

1. Wash the buckwheat and put it in a medium pot.

2. Add enough water to cover and through the butter in. Season with salt and pepper.

3. Place the pot on a strong heat and bring to boil, then lower the heat, cover and continue cooking for about 15 minutes stirring occasionally. If necessary add some water.

4. At the end the buckwheat should be tender and non sticky. You could probably compare it's consistency to steamed rice. Place it on a plate and serve as a side dish along with steak, chicken, meatballs, sausages (that's what I did. I know, LAZY!) or anything else you like.


I know that this is not a real recipe, it doesn't even involve cooking as such, but it is veeery delicious! Funny thing, the first time I ever cooked it Stratis was staring at his plate, as if asking "What the hell is THAT?!". Now he actually seems to enjoy it, yesterday he even asked for some extra! :)

Tuesday, January 25, 2011

Red-cooked Beef with Shiitake Mushrooms


Again I haven't been a good blogger. No particular reason this time. I was cooking mostly usual everyday food, soups, salads, meatballs you know. Nothing too impressive. Sometimes my cooking mood goes together with the weather, which was not exactly great these days. But today it was really amazing! After a short rain in the morning the sun came out and the whole city looked so wonderfully optimistic. I took a long ride across the canals of Amsterdam. It felt almost like spring. To be honest, each time I see sun in the sky I hope that it could be a start!

Well anyway, the day was nice and on my way home I stopped at a Turkish grocery store for supplies. Fruits, vegetables, couscous, cheese, olives... hmmm... black Shiitake mushrooms. Haven't bought them for quite some time actually. Maybe today I'll go with Chinese food.

Well the original recipe was vegetarian and required 225gr of tofu. But since I don't like tofu I substituted it by 300gr lean beef and it was very very tasty! It's nice to cook something different for a change! :)

INGREDIENTS:

300gr learn beef
4 tbsp dark soy sauce
2 tbsp dry sherry
2 tsp dark brown sugar
2 cloves garlic, crushed
1 tbsp fresh root ginger, finely chopped
8 canned Shiitake mushrooms
1 tsp cornflour
2 tbsp vegetable oil
1 cup spring onions, chopped
black pepper to taste
egg noodles, cooked

1. Cut the beef in small, slices about half centimeter thick.
2. In a bowl mix the soy sauce, sherry, sugar, garlic and ginger. Place in the beef slices in the mixture and leave to marinate for about half an hour. Drain reserving the marinade.
3. Squeeze the mushrooms, reserving the can liquid, and slice them.
4. In a small bowl mix the soy marinate, 6 tbsp of mushroom liquid and the cornflour.
5. Heat a wok and add the oil. Stir-fry the beef slices for about 5 minutes then remove from the wok and set aside.
6. Add to the wok he mushrooms and the spring onions and stir-fry for about 2-3 minutes. Pour in the marinade mixture, season with black pepper and cook until the liquid thickens.
7. Return the beef to the wok and simmer for a couple of minutes, letting the flavors to mix. Serve over the egg noodles

Sunday, January 16, 2011

Gemista - Stuffed tomatoes and peppers


Two days ago Stratis had a birthday and of course the plan was to go out with friends and have lots of drinks. But I thought it would be nice to have a good dinner at home before, just the two of us, as a part of his "special birthday treatment". So while Stratis was at his after-work squash game I kicked myself to the kitchen and prepared a lovely meal consisting of a huge salad, grilled vegetables with special marinade (recipe coming soon), Gemista and of course good Greek wine. For dessert I made an amazing Apple pie that I stole from kalofagas.ca (another "coming soon" post). So for now I'm posting the Gemista which were slightly different from what I usually cook but I think the change was for good :) Btw, Gemista is literally translated as "something stuffed".


INGREDIENTS:

5 large tomatoes
5 large red bell peppers
2 cups risotto rice (short-grained, kind of roundish)
2 onions, diced
2-3 handfuls black and white raisins
3 tbsp pine nuts
3 tbsp tomato paste
3 tbsp sugar
1/2 cup parsley, chopped
2 tbsp olive oil
salt and ground pepper to taste

1. Slice the tops from the tomatoes and the peppers and keep them aside. Remove the seeds from the peppers.
2. With a spoon remove the seeds from the tomatoes and place them in a food processor together with the sugar and tomato paste.
3. In a medium pot heat the oil and fry the onion until soft and lightly golden. Add the tomato mixture, raisins, pine nuts and rice. Season with salt and pepper. Add 1-2 cups of water and cook on low heat, adding water if necessary and stirring occasionally so that the rice does not stick to the bottom. Cook until the rice is almost cooked.
4. 2-3 minutes before the rice is ready add the parsley.
5. With a spoon stuff the tomatoes and peppers with the filling.
6. In a deep casserole dish place all the leftover filling and spread it over the bottom. Place the tomatoes and peppers on top of the rice, one next to the other close enough so that they stay vertically. Cover each vegetable with it's own top that you sliced off at the beginning.
7. Add 1 glass of water to the dish and bake the Gemista in the oven at 180oC and serve with some extra filling along with Greek yogurt and Feta cheese.

You could serve them as a main course or a starter, both hot or cold. Gemista are good in all the ways. Some people also add minced meet in the filling but I prefer raisins instead. If you wanna try them with minced meat you substitute 1/3 of the rice with the minced meet and remove the raisins.

Sunday, January 9, 2011

Oven-baked giant Greek beans


Yesterday I posted a recipe of Greek superburgers that I served with oven-baked giant beans. Well, as I promised, here is the recipe of the beans.

INGREDIENTS:

1/2 kg giant white Greek beans
1 can (400 gr) diced tomatoes
200 gr tomato puree
2 large carrots, peeled and grated
1 medium onion, diced
2-3 cloves garlic, minced
3/4 cup extra virgin olive oil
10 allspice grains
1 tsp dry basil
1 tbsp white sugar
salt and pepper to taste
1 cup water

1. Soak the beans in abundant water overnight. There should be a lot of water, as the beans will absorb it and if you only add enough to cover them after a couple of hours the ones on top will be uncovered.
2. The next day cook the beans for about 2 hours (or until the beans are soft) in unsalted water, taking care that there is enough liquid in the pot so that the beans don't burn. 10 minutes before the end add 1 tsp salt to the pot. Drain the beans and set aside.
3. In a large sauce pan heat half of the oil. Add the onions and carrots and stir fry until lightly golden. Add the diced tomatoes, tomato puree, garlic, allspice, basil, sugar and the rest of the oil, lower the heat and let the sauce cook for about 20 minutes. If the sauce becomes too thick gradually add the water.
4. Return the beans to the pot and mix well.
5. Place the mix in a baking pan, cover with foil and bake in the over at 180°C for about 10-15 minutes, then remove the foil and bake for another 5 minutes. Done!

I like serving it with some grated Parmesan or Myzithra (Greek cheese) as a side dish accompanying either grilled chicken breasts or burgers. A green salad is also a nice addition. If you decrease the amount of oil a bit, these beans are also nice for dieting as the carbs that they contain are the good, slow carbs that keep you full for a long long time.

Thursday, January 6, 2011

Spinach omelet


Again no blogging for quite some time, because of my trip home. The vacation was wonderful. I spent Christmas at Kastoria, a beautiful city in the north of Greece. Then a long drive to Thessaloniki, a week of drinking and a traditional new year's night at friend's place where we traditionally played Black Jack (I lost 1 whole euro :P) and had a traditional Vasilopita pie (my mom's recipe of the pie is coming). The pie contains a lucky coin inside and the person who gets the piece with the coin is supposed to be very lucky in the coming year. Well this year I won 3 coins, so I am very optimistic about this year!

Anyways, now I'm back to Amsterdam and cooking again. However, I didn't have time to upload the pictures so I will post another omelet recipe (too many eggs lately), which I made just few days before going home.

INGREDIENTS:

3 eggs
1 medium tomato, diced
1/2 red onion, finely chopped
1 cup fresh spinach, chopped
1/4 zucchini, diced
30-40 gr feta cheese, crashed
1/2 tsp dry oregano
salt, ground black pepper to taste
olive oil for frying
1 tbsp parsley for garnishing, finely chopped

1. In a pan with non-stick surface heat the oil. Saute the onion with zucchini until softened.
2. In a bowl beat the eggs. Add tomatoes, spinach, feta and oregano and spice up with salt and pepper.
3. Pour the egg mixture over the onion and zucchini, cover, lower the heat and cook until the omelet is hard but still juicy. Garnish with parsley and serve along with cheese or ham or both.
4. Alternatively, instead of frying you could pour all the ingredients into a baking pan and bake in the oven.

In fact you could use any vegetables you have in your fridge. When I cook it for lunch I some times use potatoes instead of zucchinis or add some ham as well. I would guess that chicken must also fit nicely. Hmmm, I might try it soon :)

Tuesday, December 14, 2010

Mushroom soup


I may have mentioned that I grew up in Russia, which means that soup was an every-day first course of the dinner. Any soup would do. The idea is that it's healthy, good for your stomach and it makes you feel full for a long time. It's just like a tradition there. And with a doctor mom, this was a must. So by the time I was 11-12 years old I fairly fed up with it. That's when my first attempts to cook something started. My mom was pretty fine with it as long as I would actually eat something healthy and not just "dry food" (meaning sandwiches, chips and all the other junk). I was quite happy about it, so I didn't eat any soup for few years, maybe just once in a blue moon.

Anyways, once upon a time, while I was already studying in Amsterdam, I was thinking of something to cook for dinner. And suddenly a soup came to my mind. I tried to get rid of this idea, still occupied by my childhood memories but it just would not go away. So, soup it is! Now, the problem was that I never cooked one in my life and of course I was too proud to call my mom to ask her. She would answer with that winning attitude "I told you one day you will appreciate it!". So I decided to figure something out myself. Back in Moscow we had this class at school where girls would learn how to cook, knit and sew and the guys were learning all those constructions and fixing the pipes and whatever else. Now that I'm thinking about it... Very unfair to divide the class, as if guys don't have to know how to cook and of course fixing the pipes could be sometimes useful for a woman as well. Anyways, at one of those classes we cooked a soup. So I tried to remember some of the basic ingredients. So... Potatoes, carrots, onions, chicken and whatever else you wanna add. Anyways, the soup turned out to be very good, I have to admit that I actually missed it and really enjoyed having it for dinner.

So now that I it is so cold and snowy outside I had a real craving for a mushroom soup. It is sooo easy to cook that I managed to actually prepare it in 2 TV breaks! Ok, I peeled the potatoes and carrots in front of the TV, which of course saved me some time but you pretty much need about 15-20 minutes in total. So here it goes:

INGREDIENTS:

2.5 liters water
1/2 chicken breast, skinless , boneless, cut into bites (optional, you could substitute it with a proper number of stock cubes for a vegetarian version)
3 cups mushrooms, washed and quartered
4 large potatoes, peeled
1 large carrot, peeled, cut in semicircles
1 large onion, diced
2-3 cloves garlic, finely chopped
2 tbsp olive oil
2 pinches rosemary
2 bay leaves
2-3 dry chillies (I like it spicy though, you could use just one or none)
1/2 cup fresh parsley, finely chopped
salt, pepper to taste

1. Cut the potatoes. Most people usually cut them into large cubes, but I follow my mom and cut them like for french fries, just a bit bigger.
2. Place a pot with water on a strong heat, add the potatoes, chicken, rosemary, bay leaves and chillies with some salt and let them cook.
3. Meanwhile warm up 1 tbsp of oil and fry the mushrooms until they are nicely golden.
4. 5 minutes after the water in the pot starts boiling add the fried mushrooms to the soup.
5. In the same pan that you used for the mushrooms warm up the rest of the oil and fry there the carrots along with onion and garlic until the vegetables are soft. Pour the mix into the pot with the soup.
6. Cook until the potatoes are soft and you could break them with a spoon. Add the parsley and adjust the seasoning. Let it cook for a couple of minutes more so that the parsley releases it's flavor. Turn off the heat and let the soup cool just a little before serving.

Another thing that I started using in the soup lately is ginger. Just finely chop a 2cm piece of ginger root and add it together with carrots and onions. It gives to the soup a really nice spicy touch and it smells wonderfully. But you could skip it and use any other spice that you like. Also if you wanna make it even healthier than it already is, don't fry the vegetables, and just add them raw to the pot. You could also avoid the oil this way, but believe me, frying makes it much more delicious and the oil gives a beautiful golden color to the stock.

Friday, December 10, 2010

Tzatziki


About 10 days ago I was hosting one of the multiple dinner parties. This time I decided to go with the Greek food. Sort of missed it lately. And of course it's not possible to have a Greek dinner without Tzatziki. It is a part of almost any order in a traditional Greek taverna and could be combined with any food, either fish or meat or even just bread. When I make it, I usually make a large amount and it's never too much! The only problem is that it has a lot of garlic in it, so if you plan to kiss someone after eating it... well you better don't!

INGREDIENTS:

500gr thick, Greek yogurt (Straggisto type preferably)

1 cucumber (you could remove the skin if you want, I usually keep it to add some color)

2-3 cloves garlic, minced

3-4 tbsp fresh dill, chopped

salt to taste


1. Grate the cucumber on a large grater. Keep all the juices and put it in a medium bowl.

2. Add the yogurt, garlic and dill and season with some salt. So simple!

Saturday, November 20, 2010

Greek Salad


In Greece when you order a Horiatiki (=vilage) salad, more popular abroad as Greek salad, you always know what you are gonna get. It could be bigger or smaller, better or worse but it is always the same salad, consisting of the same ingredients. Funny thing, while living abroad I met many non-Greek people who have absolutely different thing in mind when they talk about Greek salad. Some people use lettuce in it, some dice the tomatoes, I've even heard about using a watermelon in it! I was really curious to see what other versions there are, so I googled it and I figured out many combinations that were at least weird.

So I decided to post a recipe of the original Greek salad, the one that you will get in one of those nice tavernas next to the see. The only tricky thing about it is to find good, tasty tomatoes, the ones that smell like your grandma's garden! Apart from that it's only chopping and mixing and that's it. You could use more or less any amounts of the listed ingredients you like. Here I will post the amounts that I prefer, which create a balanced combination. So, here we go.

INGREDIENTS:

2 large, ripe tomatoes
1 cucumber about 20cm long
1 medium onion, cut in half rings
feta cheese, as much as you like (I use about 100 gr for this amounts of vegetables, but I like lots of feta in the salad)
10-12 olives (I like green olives, other people use, black or kalamata or even ksidates (=marinated in vinegar), they all work great!)
1/2 tbsp dry oregano
5-6 tbsp extra virgin olive oil
2 tbsp wine vinegar (optional)
salt to taste

1. Cut each tomato in 6-8 pieces and put them in a large bowl. Never dice them, and don't try to make the pieces small. This way all the juice will remain in the tomato, instead of the bowl.
2. Cut the cucumbers into half-circle pieces, again not too thin. Add them to the tomatoes.
3. Add the onion and olives and place some pieces of feta cheese on top.
4. Prepare the dressing: mix together the oil, oregano, salt and vinegar (if using) and pour over the salad. Alternatively, you could just add the dressing ingredients to the salad directly and then mix everything in the bowl. Ready to enjoy!

Now, one of the most important parts, how to eat it! You would think this is easy, but... Most of the non-Mediterranean people would simply transfer some of the salad from the common bowl to their own plate or maybe even use a separate salad plate. Wrong! In Greece we like sharing our food, whatever it is. When going out with friends we almost never order separate dishes, rather mixed plates for the table and then everybody bites from this and that, trying everything. I guess this is one of many ways that we have to bring people closer. Same goes to the salads. You will see in Greek restaurants people poking pieces of tomato and cucumber in the same bowl and at the end dipping pieces of fresh bread into the juices mixed with olive oil left in the bowl. I know that this might seem gross for many people but this is the way we enjoy our food. You should absolutely try it this way! Otherwise, it's not a Greek salad anymore! ;)

Saturday, November 13, 2010

Croissant with Banana and Chocolate


Last Friday we went out with an Italian friend of ours. After watching a movie, topped with a couple of beers and while the time was already past midnight I suddenly figured that I was a bit hungry. The fact that beer is a liquid bread didn't really help, and my thoughts were jumping from one nice food to the other. At some point I realized that I was already thinking about the great breakfast that I would cook the next morning. Banana and chocolate croissants! I have to admit that the idea of mixing bananas with Nutella is not mine. Back in Thessaloniki (my home city), while being a student, this was one of my most favorite sweet crepes from Valentino. Ok, maybe second favorite after Nutella with cookies' crumples. So I figured: "What's better than crepe with Nutella + banana? A croissant with Nutella + banana!!!". And here I was, in the middle of the night, slightly drunk and thinking about my breakfast!

INGREDIENTS:
1 pack of croissant dough, that makes 6 croissants

1 banana

6 tsp Nutella

1 egg lightly beaten (optional)

1. Preheat the oven at 200°C.

2. With a sharp knife cut the dough along the marked lines, so that you obtain 6 triangles.

3. Spread 1 tsp of Nutella over the surface of each triangle avoiding the top.

4. Cut the banana in half and slice each half in 3 pieces. Place one piece on each dough triangle, along it's short side.

5. Holding the banana inside, roll the croissant in a nice roll, starting from the short side of the triangle. Don't press to much. There should be some space between the layers for the croissants to "grow". Otherwise the croissants won't be puffy.

6. Brush the croissants with the beaten egg.

7. Place the croissants on a buttered baking tray and bake in the oven for about 15 minutes, or until they are nicely golden and crispy.

8. Let them cool a bit and serve with some custard sugar.


Tuesday, November 9, 2010

Mediterranean Chicken Orzo


Orzo is a type of pasta. In Greek it's called Kritharaki and it looks just like rice. In fact, it looks so much like rice, that when I cooked it for my 30 year-old cousin who lived in Russia his whole life, I actually had to convince him that it is not rice!

Usually there are two different "sizes" of orzo. It doesn't really matter which one you use. The difference is mostly visual and of course the one that is bigger requires a little more time to cook. But you could always try and see if it's ready.

Anyways, I was not really expecting to find this kind of pasta in Amsterdam, as it is supposed to be something very local. Imagine my surprise when I saw it while checking the Turkish stores in the neighbourhood. One of the many great things that I can find only there. That's why it feels like home. At the end, Greek and Turkish cooking have a lot in common. Well good for us, because I haven't seen any Greek store here around, so the Turkish guys really save me from missing mom's great cooking!

I was so happy that I found orzo in Amsterdam that I used the whole 500 gr pack of it. Of course the resulting amount of food turned out enormous for only two people. So you may as well cut all the amounts in half.

INGREDIENTS

500 gr orzo pasta
400 gr skinless, boneless chicken breast, chopped in bites (You could prepare it without chicken for a vegetarian version. It is still very delicious!)
2 tbsp extra virgin olive oil
1 large onion, diced
3-4 cloves garlic, minced
1 cup mushrooms, chopped
1 large carrot, chopped
1 zucchini, diced
1 green pepper, sliced
2 cans chopped tomatoes
1 tbsp pine nuts
1 tbsp dried oregano
1 tsp dried thyme
1 tsp coriander seeds
1 tsp chilly flakes
2 tsp sugar
10 grains allspice
2 tbsp fresh basil leaves
salt and ground black and red pepper to taste

1. Cook the orzo just as you would cook a regular pasta, in a pot of boiling salted water, until it is almost soft. Drain and set aside.
2. In a large pan heat the oil. Add the chicken and cook over a medium heat until the chicken is cooked through.
3. Add onions, garlic, mushrooms, carrots, green pepper and pine nuts. Cover and cook until the vegetables are soft.
4. Pour in the tomatoes and bring to boil. Add the zucchini, herbs and spices and cook over a low heat for about 15 minutes. Turn the heat off and let the orzo absorb the juices for few minutes.
5. Add the basil leaves and serve.

Alternatively you could put the mixture into a ceramic oven-proof dish, spread some mozzarella on top and bake in the oven for few minutes until the cheese makes a nice golden crust.